Trip computer
Trip computer
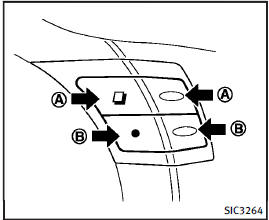
Switches for the trip computer are located on the right side of the combination meter panel. To operate the trip computer, push the side or front of the switches as shown above.

When the ignition switch is pushed to the ON position, modes of the trip computer can be selected by pushing the
 switch A .
Each time the switch A is pushed,
the display will change as follows: Current fuel consumption
 Average
fuel consumption and speed Elapsed time and trip odometer
Distance to empty (dte)
Outside air temperature (ICY)
Setting Warning check
Average
fuel consumption and speed Elapsed time and trip odometer
Distance to empty (dte)
Outside air temperature (ICY)
Setting Warning check
1. Current fuel consumption
The current fuel consumption mode shows the current fuel consumption.
2. Average fuel consumption (MPG or l (liter)/100 km) and speed (MPH or km/h)
Fuel consumption:
The average fuel consumption mode shows the average fuel consumption since the last reset. Resetting is done by pushing the
 switch B for longer than 1 second.
(The average speed is also reset at the same time.) The display is updated every 30 seconds.
At about the first 1/3 mile (500 m) after a reset, the display shows “——”.
Speed:
The average speed mode shows the average vehicle speed since the last reset.
Resetting is done by pushing the switch B for longer than 1 second.
(The average fuel consumption is also reset at the same time.) The display is updated every 30 seconds.
The first 30 seconds after a reset, the display shows “——”.
3. Elapsed time and trip odometer (mls or km)
Elapsed time:
The elapsed time mode shows the time since the last reset. The displayed time can be reset by pushing the
switch B for longer than 1 second. (The trip odometer is also reset at the same time.)
Trip odometer:
The trip odometer mode shows the total distance the vehicle has been driven since the last reset. Resetting is done by pushing the
switch B for longer than 1 second. (The elapsed time is also reset at the same time.)
4. Distance to empty (dte — mls or km)
The distance to empty (dte) mode provides you with an estimation of the distance that can be driven before refueling. The dte is constantly being calculated, based on the amount of fuel in the fuel tank and the actual fuel consumption.
The display is updated every 30 seconds.
The dte mode includes a low range warning feature. If the fuel level is low, the warning is displayed on the screen.
When the fuel level drops even lower, the dte display will change to “——”.
• If the amount of fuel added is small, the display just before the ignition switch is pushed to the OFF position may continue to be displayed.
• When driving uphill or rounding curves, the fuel in the tank shifts, which may momentarily change the display.
5. Outside air temperature (ICY — °F or °C)
The outside air temperature is displayed in °F or °C in the range of −22 to 131°F (−30 to 55°C).
The outside air temperature mode includes a low temperature warning feature. If the outside air temperature is below 37°F (3°C), the warning is displayed on the screen.
The outside temperature sensor is located in front of the radiator. The sensor may be affected by road or engine heat, wind directions and other driving conditions.
The display may differ from the actual outside temperature or the temperature displayed on various signs or billboards
6. Setting
Setting cannot be made while driving. A message “Setting can only be operated when stopped” is also displayed on the dot matrix crystal display.
The switch A and
switch B are used in the setting mode to select and decide a menu.
SKIP:
Push the switch A to move to
the warning check mode.
Push the switch B to select other menus.
ALERT:
There are 3 submenus under the alert menu.
• BACK Select this submenu to return to the top page of the setting mode.
• TIME TO REST Select this submenu to specify when the “time to rest” indicator activates.
• ICY Select this submenu to display the low outside temperature warning.
MAINTENANCE:
There are 5 submenus under the maintenance menu.
• BACK
Select this submenu to return to the top page of the setting mode.
• ENGINE OIL
Select this submenu to set or reset the distance for changing the engine oil.
• OIL FILTER
Select this submenu to set or reset the distance for replacing the oil filter.
• TIRE
Select this submenu to set or reset the distance for replacing tires.
• OTHER
Select this submenu and set or reset the distance for replacing items other than the engine oil, oil filter and tires.
DISPLAY:
There are 3 submenus under the display menu.
• BACK
Select this submenu to return to the top page of the setting mode.
• LANGUAGE
Select this submenu to choose English or French for display.
• UNIT
Select this submenu to choose the unit from MPG or l/100 km.
7. Warning check
SKIP:
Push the switch A to move to
the warning check mode.
Push the switch B to select other menus.
DETAIL:
This item is available only when a warning is displayed.
Select this menu to see the details of warnings.
See also:
Maintenance requirements
Your INFINITI has been designed to have minimum maintenance requirements with long service intervals to save you both time and money.
However, some day-to-day and regular maintenance is essential t ...
Distance control assist operation
Always pay attention to the operation of the vehicle and be ready to manually decelerate to maintain the proper following distance. The Distance Control Assist (DCA) system may not be able to decele ...
Operating tips
● When the shift selector is shifted to the R (Reverse) position, the display screen automatically changes to the RearView Monitor mode. However, the radio can be heard.
● When the view ...