Steering wheel switch for audio control

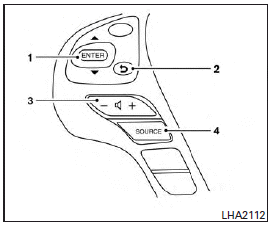
1. Menu control switch/ENTER button
2. Back switch
3. Volume control switch
4. Power on and SOURCE select switch
The audio system can be operated using the controls on the steering wheel.
POWER on switch
With the ignition switch in the ACC or ON position, push the SOURCE switch to turn the audio system on.
SOURCE select switch
Push the source select switch to change the mode in the following sequence:
Models without Navigation System:
AM → FM1 → FM2 → XM1 → XM2 → XM3 (satellite radio, if so equipped) → USB* (if so equipped) → CD/DVD*→→AUX* → AM.
Models with Navigation System:
AM → FM1 → FM2 → XM1 → XM2 → XM3 (satellite radio, if so equipped) → CD/DVD*→ USB/iPod * → Bluetooth Audio* → AUX* → AM.
* These modes are only available when compatible media storage is inserted into the device.
Volume control switch
Push the volume control switch to increase or decrease the volume.
 Menu control switch/ENTER button
While the display is showing a MAP, STATUS or Audio screen, tilt the Menu Control switch upward or downward to select a station, track, CD or folder. For most audio sources, tilting the switch up/down for more than 1.5 seconds provides a different function than a tilting up/down for less than 1.5 seconds.
AM and FM:
● Tilt up/down for less than 1.5 seconds to increase or decrease the preset station.
● Tilt up/down for more than 1.5 seconds to seek up or down to the next station.
● Press the ENTER button to show the list of preset stations.
XM (if so equipped):
● Tilt up/down for less than 1.5 seconds to increase or decrease the preset station.
● Tilt up/down for more than 1.5 seconds to go to the next or previous category.
● Press the ENTER button to show the XM Menu.
iPod (if so equipped):
● Tilt up/down for less than 1.5 seconds to increase or decrease the track number.
● Press the ENTER button to show the iPod Menu.
CD:
● Tilt up/down for less than 1.5 seconds to increase or decrease the track number.
● Tilt up/down for more than 1.5 seconds to increase or decrease the folder number (if playing compressed audio files).
● Press the ENTER button to show the CD Menu.
DVD (if so equipped):
● Tilt up/down for less than 1.5 seconds to increase or decrease the track number.
● Tilt up/down for more than 1.5 seconds to increase or decrease the title number.
● Press the ENTER button to select an item from the DVD display.
● When the transparent operation menu appears, the switch will control the menu.
USB (if so equipped):
● Tilt up/down for less than 1.5 seconds to increase or decrease the track number.
● Tilt up/down for more than 1.5 seconds to increase or decrease the folder number.
● Press the ENTER button to show the USB Menu.
Bluetooth Audio (if so equipped):
● Tilt up/down for less than 1.5 seconds to increase or decrease the track number.
AUX:
● Press the ENTER button to show the AUX Menu.
BACK switch
Press the  switch to return to the
previous screen or cancel the current selection.
switch to return to the
previous screen or cancel the current selection.
See also:
Troubleshooting guide
The system should respond correctly to all voice commands without difficulty. If problems are encountered, follow the solutions given in this guide for the appropriate error.
Where the solutions ar ...
Cabin Comforts
The IPL's refined interior is trimmed in premium-feel materials and has a
dynamic look. Brushed aluminum looks classy, as does Infiniti's hallmark analog
clock. Soft-touch leather and plastic piec ...
Antifreeze
In the winter when it is anticipated that the outside temperature will drop below 32°F (08C), check antifreeze to assure proper winter protection. For additional information, see “Engine cooling syste ...