Changing a flat tire

If you have a flat tire, follow the instructions below:
Stopping the vehicle
1. Safely move the vehicle off the road and away from traffic.
2. Turn on the hazard warning flashers.
3. Park on a level surface and apply the parking brake. Move the shift selector to P (Park).
4. Turn off the engine.
5. Raise the hood to warn other traffic and to signal professional road assistance personnel that you need assistance.
6. Have all passengers get out of the vehicle and stand in a safe place, away from traffic and clear of the vehicle.
WARNING
● Make sure the parking brake is securely applied and the automatic transmission is shifted into P (Park).
● Never change tires when the vehicle is on a slope, ice or slippery areas. This is hazardous.
● Never change tires if oncoming traffic is close to your vehicle. Wait for professional road assistance.
Blocking wheels
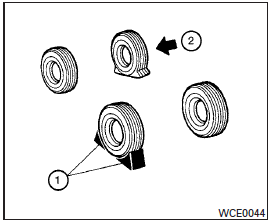
Place suitable blocks 1 at both the front and back of the wheel diagonally opposite the flat tire 2 to prevent the vehicle from moving when it is jacked up.
WARNING
Be sure to block the wheel as the vehicle may move and result in personal injury.
Getting the spare tire and tools
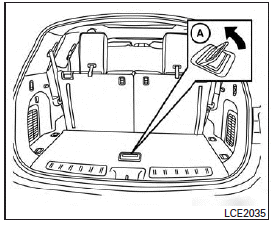
1. Open the liftgate, and lift the luggage board in the cargo area using the handle
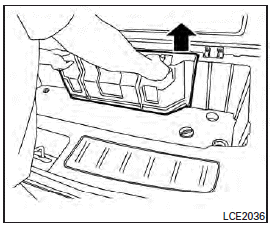
2. Remove the jack and tool kit cover by lifting up using the handles.
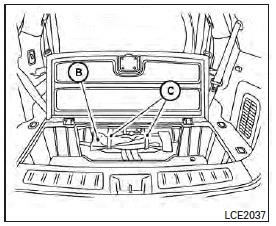
3. Remove the tool kit B .
● To release the tool kit, release the hook and eye straps C .
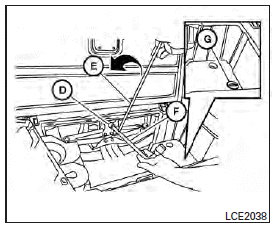
4. Remove the jack.
● The jack is secured by a fastener D , to release the fastener assemble the extension E into the wheel nut wrench F as illustrated and rotate counterclockwise to release.
● Insert the flat end if the wheel nut wrench F into the slot of the fastener D , and rotate counterclockwise to release the jack.
5. The lowering mechanism for the spare tire is located on the passenger side of the cargo area. Remove the cover G to access the spare tire winch.
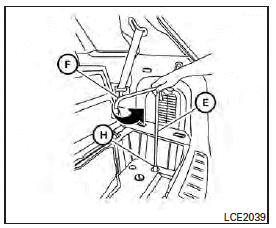
6. Insert the spare tire winch socket H to the lowering mechanism nut.
7. To lower the spare tire, insert the wheel nut wrench F to the extension E and insert the T-shaped end to the winch socket H and rotate counterclockwise.
8. After removing the spare tire from under the vehicle, be sure to crank the cable up to stow it.
NOTE:
Fully lower the spare tire below the vehicle before attempting to remove the winch from the spare tire.
CAUTION
● Make sure safety cable is coiled above spare tire when reinstalling spare tire/wheel.
● When re-installing the spare tire under the vehicle after use, be sure to secure it with the tire stem facing down toward the ground. If the spare tire is improperly secured with the tire stem facing up towards the bottom of the vehicle, there is an increased risk of separating from the vehicle in the event of crash which may pose a hazard in traffic or risk of injury to others.
See also:
Good Ride, Better Handling
Though firmer than some in this class — the Mercedes C-Class, for one — the
G37 rides comfortably, especially given our test car's stiffer rear-shock
tuning, 18-inch wheels and lower-profile tires ...
iPod * player operation
Connecting iPod
To connect an iPod to the vehicle so that the iPod can be controlled with the audio system controls and display screen, use the USB jack 1 located in the center console. Connect th ...
Playing a DVD
DISC·AUX button:
Park the vehicle in a safe location for the front seat occupants to operate the DVD drive while watching the images.
Push the DISC·AUX button on the instrument panel and turn the di ...